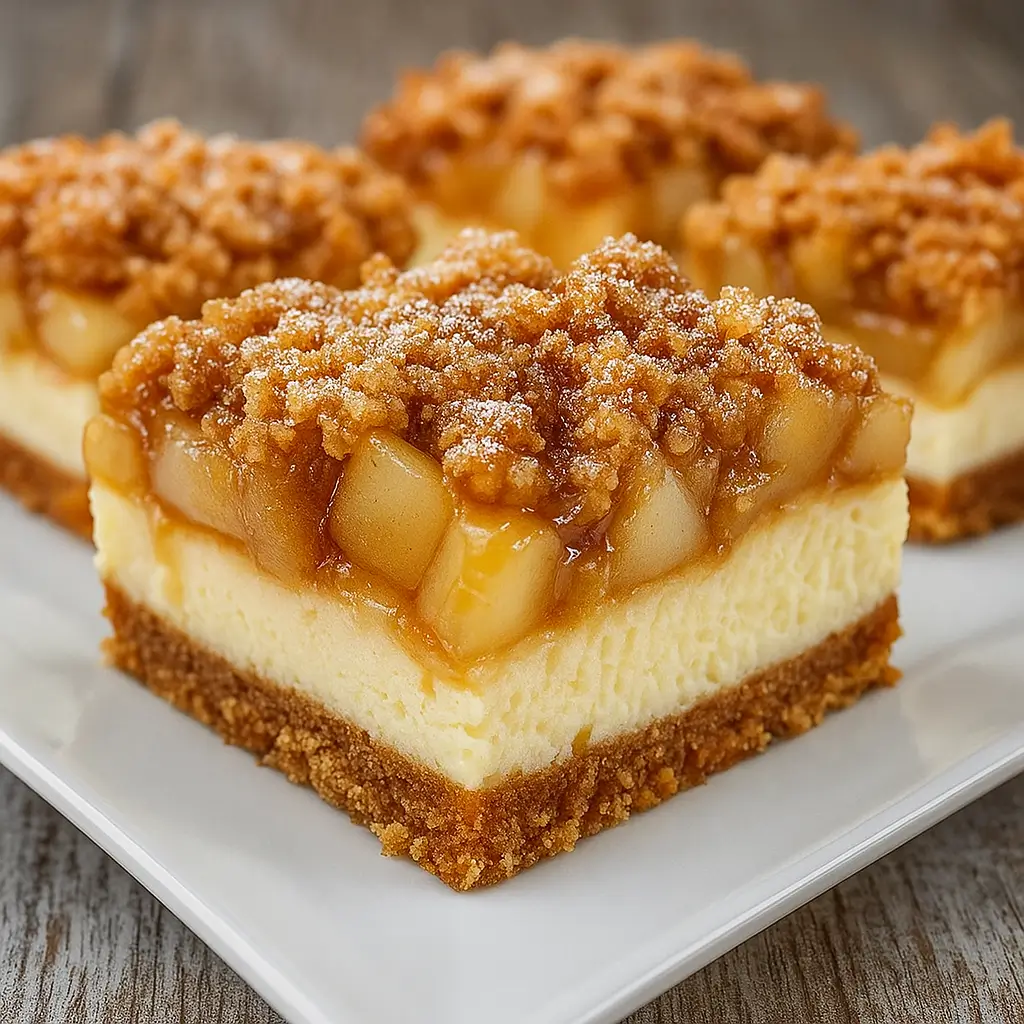
Sweet Apple Crisp Cheesecake Squares are the kind of dessert that make you pause mid-bite and think, “Wow, this might be better than actual apple pie.” Picture creamy cheesecake layers mingling with cinnamon-spiced apples, all snuggled beneath a crunchy oat crumble and buttery graham crust.
These bars strike that perfect balance between cozy fall flavors and smooth, bakery-style indulgence — no fork fight necessary. If you’re the type who sneaks bites straight from the pan, well, I won’t judge. Whether you’re hosting a fall potluck, celebrating Thanksgiving, or just craving something sweet on a Tuesday, Sweet Apple Crisp Cheesecake Squares are your ticket to dessert bliss. They’re make-ahead friendly, travel easily, and best of all, each bite feels like a warm hug — but with more cinnamon.
Table of Contents
Table of Contents
What is Sweet Apple Crisp Cheesecake Squares?
Sweet Apple Crisp Cheesecake Squares are a hybrid dessert that combines the best of three worlds: the creamy texture of cheesecake, the comforting flavor of apple crisp, and the buttery crunch of a graham cracker crust. The base layer is a golden graham crust that supports a luscious cream cheese filling — smooth, slightly tangy, and rich. Then comes a topping of cinnamon-spiced diced apples that bring sweetness and warmth, finished off with an oat crumble that bakes up crisp and golden.
The result? A dessert bar that’s soft, crunchy, and perfectly balanced. It’s the kind of treat that tastes like fall but works all year round. If you love desserts like Apple Crisp Cheesecake, this bar version is a simpler, grab-and-go twist you’ll adore.
Reasons to Try Sweet Apple Crisp Cheesecake Squares
If you’re still debating whether to make these bars, here’s your nudge. First, they’re surprisingly easy — no need for a water bath or fancy tools. You can whip them up with basic pantry ingredients and still impress like a pastry chef. Second, they’re a crowd-pleaser. The creamy-meets-crunchy combo wins over everyone, from picky eaters to die-hard dessert snobs. Third, they store beautifully, so you can bake them a day ahead and chill until needed. Plus, the smell while baking? Pure heaven. If you love warm apple desserts like Apple Cinnamon Streusel Muffins, this recipe takes that cozy aroma and wraps it in creamy cheesecake bliss. These squares are also vegetarian-friendly and freezer-approved — a total win for busy cooks.
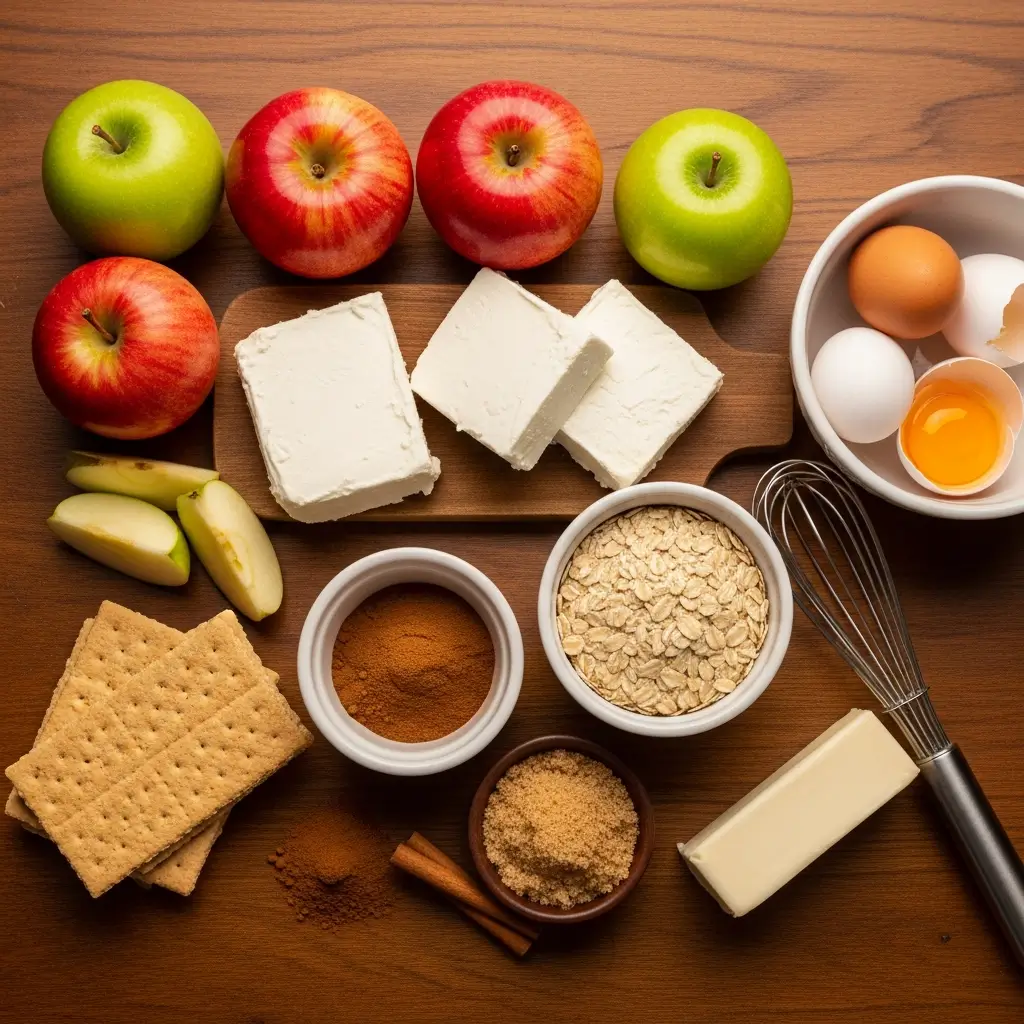
Ingredients Needed to Make Sweet Apple Crisp Cheesecake Squares
Crust: 1½ cups graham cracker crumbs, ¼ cup granulated sugar, 6 tbsp melted unsalted butter.
Cheesecake Layer: 16 oz softened cream cheese, ⅔ cup sugar, 2 large eggs, ¼ cup sour cream, 1 tsp vanilla extract, 1 tbsp flour, pinch of salt.
Apple Filling: 2 medium apples (peeled, cored, diced), 2 tbsp brown sugar, 1 tsp cinnamon, ¼ tsp nutmeg, 1 tbsp lemon juice.
Crisp Topping: ½ cup flour, ½ cup oats, ⅓ cup brown sugar, ½ tsp cinnamon, ¼ tsp salt, ¼ cup cold cubed butter.
Instructions to Make Sweet Apple Crisp Cheesecake Squares
Let’s dive into this easy Step by Step guide for making Sweet Apple Crisp Cheesecake Squares. Whether you’re a seasoned baker or new to dessert-making, this process walks you through every detail so your bars turn out creamy, golden, and irresistible every single time. For extra baking tips and ingredient swaps, you can check out my guide on Apple Crisp Cheesecake — it’s a similar dessert with extra insight on perfect cheesecake textures.
Step 1: Prepare Your Pan and Preheat the Oven
Start your Step by Step journey by preheating your oven to 350°F (175°C). Line a 9×9-inch baking pan with parchment paper, leaving some overhang on the sides — this makes it easier to lift the bars out later. If you’ve ever struggled to remove a dessert from a pan without breaking it, this trick is a game-changer. A light mist of nonstick spray under the parchment helps it stay in place. While your oven warms up, make sure all your ingredients are at room temperature (especially the cream cheese). Room-temperature ingredients blend more smoothly — one of the secrets to creamy cheesecake success.
Step 2: Make the Buttery Graham Cracker Crust
This step gives your dessert its foundation. In a mixing bowl, combine 1½ cups of graham cracker crumbs, ¼ cup of granulated sugar, and 6 tablespoons of melted butter. Stir until the crumbs are evenly moistened — it should feel like damp sand. Pour the mixture into your prepared pan, and using the back of a spoon or a flat-bottomed glass, press it down firmly to form an even layer.
This crust adds a slightly salty, buttery contrast to the sweet, creamy layers above. Bake for 8 minutes until it’s lightly golden and fragrant. Let it cool on a wire rack while you move to the next Step by Step layer. For an alternative crust idea, check out Key Lime Pie Trifle, which uses similar crust principles but in a creamy trifle format.
Step 3: Whip Up the Cheesecake Layer
Here’s where the magic starts. In a large bowl, beat together 16 ounces of cream cheese and ⅔ cup of granulated sugar until completely smooth — no lumps in sight. Add 2 eggs, one at a time, blending well after each addition.
Next, mix in ¼ cup of sour cream, 1 teaspoon of vanilla extract, 1 tablespoon of all-purpose flour, and a pinch of salt. The flour gives your cheesecake structure, while the sour cream adds that signature tang and creamy richness. Avoid overmixing — just beat until everything’s blended. Pour this luscious mixture over your cooled crust, smoothing it out with a spatula for an even layer. If you’re curious about the science of creamy cheesecakes, my post on Blueberry Cream Cheese Bread covers more on texture control and baking balance.
Step 4: Create the Spiced Apple Filling
For the fruity heart of these bars, peel, core, and dice 2 medium apples into small, bite-sized pieces. In a separate bowl, toss the apples with 2 tablespoons of brown sugar, 1 teaspoon of cinnamon, ¼ teaspoon of nutmeg, and 1 tablespoon of lemon juice. The lemon juice not only brightens the flavor but also keeps the apples from browning. As you mix, you’ll notice that familiar fall aroma — the kind that fills your kitchen with warmth.
Evenly scatter the spiced apple mixture over your cheesecake layer. Don’t press them down too much; you want them nestled gently into the batter. For a twist, you can experiment with pears or a mix of apples and berries — similar to the fruit blend used in my Honeycrisp Apple and Feta Salad.
Step 5: Make the Cinnamon-Oat Crisp Topping
Now comes the crispy crown. In another bowl, whisk together ½ cup flour, ½ cup old-fashioned oats, ⅓ cup brown sugar, ½ teaspoon cinnamon, and ¼ teaspoon salt. Add ¼ cup cold, cubed butter. Use a pastry cutter or your fingertips to cut the butter into the dry ingredients until you get coarse crumbs — think pea-sized bits of butter. The key in this Step by Step process is to keep the butter cold, which helps create that crumbly texture. Sprinkle this topping evenly over the apple layer. Don’t skimp — it’s what gives that classic apple crisp crunch on top of your creamy cheesecake. If you love oat toppings, you’ll find this technique in my Apple Cinnamon Streusel Muffins too.
Step 6: Bake to Perfection
Place the pan in the preheated oven and bake for 40–45 minutes, or until the center looks mostly set but still slightly jiggly when you gently shake the pan. This jiggle means your cheesecake will stay creamy once cooled. Your kitchen will smell like a cozy bakery — apples, cinnamon, and butter blending into one comforting scent. Once baked, set the pan on a wire rack to cool completely at room temperature. This step prevents cracking and keeps your cheesecake silky smooth.
Step 7: Chill and Slice for Clean, Creamy Bars
Patience is key here. Once the bars have cooled, transfer them to the refrigerator and chill for at least 2 hours — overnight if you can. Chilling helps the layers firm up, making it easier to slice clean squares. When ready, lift the dessert from the pan using the parchment overhang, and cut into 16 even squares with a sharp knife. Wipe the blade between cuts for picture-perfect edges. These bars are delicious cold, but if you prefer a softer bite, let them sit at room temperature for 10–15 minutes before serving.
For a full dessert spread idea, try pairing these with Banana Oatmeal Muffins for breakfast or Apple Crisp Cheesecake for a richer, classic cheesecake version.
Final Step by Step Tip:
Store your Sweet Apple Crisp Cheesecake Squares in the fridge for up to 5 days or freeze them for up to 3 months. When you’re ready to enjoy, let them thaw overnight for that perfect creamy-crunchy bite.
This Step by Step method guarantees success — a buttery crust, velvety cheesecake, tender spiced apples, and a golden crisp topping. Follow each step with care, and you’ll have a dessert that looks like it came straight from a café display case — only better because it’s homemade.
What to Serve with Sweet Apple Crisp Cheesecake Squares
These bars are lovely on their own, but you can easily dress them up. A scoop of vanilla ice cream or a drizzle of caramel sauce makes them extra indulgent. For something lighter, try pairing them with Honeycrisp Apple and Feta Salad — sweet meets savory in the best way. If you’re planning a brunch spread, add Banana Oatmeal Muffins or Kale Apple Salad for balance. And if you’re serving these after dinner, a warm cup of coffee or cinnamon tea ties it all together.
Key Tips for Making Sweet Apple Crisp Cheesecake Squares
Use room temperature cream cheese for the smoothest texture. Cold cream cheese can lead to lumps, and no one wants that. When mixing, avoid overbeating the batter — it can trap too much air and cause cracks. Choose firm, slightly tart apples like Honeycrisp or Granny Smith to balance the sweetness. For a crunchier top, refrigerate the crumble topping for 10 minutes before baking. Finally, let the bars cool fully before slicing. Patience is your secret ingredient here!
Storage and Reheating Tips for Sweet Apple Crisp Cheesecake Squares
Store leftovers in an airtight container in the fridge for up to 5 days. For longer storage, freeze the squares (well-wrapped) for up to 3 months. To serve, thaw overnight in the fridge or warm slightly in the microwave — just 10 seconds to bring back that buttery aroma. Avoid reheating for too long, as cheesecake doesn’t like to be rushed. If you plan to make them ahead for a party, bake and chill them the day before for stress-free serving.
FAQs
Can I use a different crust? Yes! Try crushed vanilla wafers or shortbread cookies for variety.
What apples work best? Honeycrisp, Granny Smith, or Fuji apples hold up beautifully.
Can I make it gluten-free? Substitute gluten-free graham crackers and flour; the texture stays just as dreamy.
How do I prevent cracks? Don’t overbake — it’s okay if the center jiggles slightly.
Final Thoughts
Sweet Apple Crisp Cheesecake Squares are proof that good things come in small (and square) packages. They’re comforting, creamy, and just a little fancy — the perfect treat when you want something homemade that still feels bakery-level special. Whether you make them for a fall gathering or a quiet Sunday treat, they’re bound to disappear fast. Go ahead, bake them once, and watch them become your new go-to dessert bar.
Visit our Pinterest for regular slow cooker recipe updates, or join our Facebook discussions where cooking fans exchange their favorite hearty meal ideas.
Print
Sweet Apple Crisp Cheesecake Squares
- Prep Time: 30 minutes
- Cook Time: 50 minutes
- Total Time: 80 minutes
- Yield: 16 portions 1x
- Category: Sweet Treats
- Method: Baking
- Cuisine: American
- Diet: Vegetarian
Description
Creamy cheesecake bars with spiced apples and a cinnamon-oat crumble topping on a buttery graham cracker crust.
Ingredients
- Crust
- 1 1/2 cups graham cracker crumbs
- 1/4 cup granulated sugar
- 6 tbsp unsalted butter, melted
- Cheesecake Layer
- 16 oz cream cheese, softened
- 2/3 cup granulated sugar
- 2 large eggs
- 1/4 cup sour cream
- 1 tsp vanilla extract
- 1 tbsp all-purpose flour
- Pinch of salt
- Apple Filling
- 2 medium apples, peeled, cored, diced
- 2 tbsp brown sugar
- 1 tsp ground cinnamon
- 1/4 tsp ground nutmeg
- 1 tbsp lemon juice
- Crisp Topping
- 1/2 cup all-purpose flour
- 1/2 cup old-fashioned oats
- 1/3 cup brown sugar
- 1/2 tsp ground cinnamon
- 1/4 tsp salt
- 1/4 cup unsalted butter, cold and cubed
Instructions
1. Preheat oven to 350°F. Line a 9×9-inch baking pan with parchment paper, leaving an overhang for easy lifting.
2. Combine graham cracker crumbs, sugar, and melted butter in a bowl. Press evenly into the prepared pan. Bake for 8 minutes. Let cool slightly.
3. In a large bowl, beat cream cheese and sugar until smooth. Add eggs one at a time, mixing well. Add sour cream, vanilla, flour, and salt; blend until just combined. Pour over the cooled crust.
4. Toss diced apples with brown sugar, cinnamon, nutmeg, and lemon juice. Scatter evenly over the cheesecake layer.
5. In a bowl, mix flour, oats, brown sugar, cinnamon, and salt. Cut in the cold butter with a pastry cutter or fingers until coarse crumbs form. Sprinkle evenly over the apples.
6. Bake for 40–45 minutes, until the center is almost set. Cool completely at room temperature.
7. Chill in the refrigerator for at least 2 hours before slicing. Lift bars from the pan using parchment. Cut into 16 squares and serve chilled or at room temperature.
Notes
Use firm apples like Granny Smith or Honeycrisp for the best texture and flavor.
Bars can be made a day ahead—flavor improves after chilling.
Store bars covered in the refrigerator for up to 4 days.
Use parchment with overhang to lift out bars cleanly for neat slicing.
Nutrition
- Serving Size: 1 square
- Calories: 270
- Sugar: 21g
- Sodium: 160mg
- Fat: 17g
- Saturated Fat: 10g
- Unsaturated Fat: 6g
- Trans Fat: 0g
- Carbohydrates: 25g
- Fiber: 1g
- Protein: 4g
- Cholesterol: 60mg