Strawberry Shortcake Layer Cake is the kind of dessert that makes you feel like you’ve just stepped into summer, even if there’s snow on the ground. Picture layers of fluffy vanilla cake, clouds of whipped cream frosting, and a mountain of juicy, syrupy strawberries between each bite. It’s the classic strawberry shortcake you know and love—but taken up a notch into a show-stopping, bakery-worthy layer cake.
Whether you’re celebrating a birthday, hosting a backyard barbecue, or just need an excuse to bake something beautiful, this Strawberry Shortcake Layer Cake will absolutely steal the show. Plus, with this easy step-by-step guide, even if you’re not a pro baker, you’ll whip up a dessert that looks (and tastes) like it came straight from a fancy patisserie.
Table of Contents
What is Strawberry Shortcake Layer Cake?
Strawberry Shortcake Layer Cake is a modern spin on the beloved American classic—strawberry shortcake. Traditionally, shortcake is a sweet biscuit layered with strawberries and whipped cream. This cake version takes all those nostalgic flavors and turns them into a light, moist vanilla sponge stacked with macerated strawberries and thick, stabilized whipped cream frosting.
The cream cheese in the frosting adds a tangy balance to the sweetness, while the juicy strawberries bring that burst of fresh, fruity flavor we all crave. It’s everything you love about a strawberry shortcake—but taller, softer, and downright irresistible.
Reasons to Try Strawberry Shortcake Layer Cake
If you’re wondering whether this Strawberry Shortcake Layer Cake is worth your time, here’s the short answer: yes, absolutely. For one, it’s a visual masterpiece. The fresh berries peeking through the layers make it a true centerpiece for any dessert table. But the real magic happens when you take that first bite—the tender vanilla cake soaked with sweet strawberry syrup and topped with whipped cream that tastes like a dream. It’s not overly rich, which means you can enjoy a big slice without feeling weighed down.
It’s also surprisingly simple to make; you don’t need fancy tools or a degree in pastry arts. Plus, it’s a guaranteed crowd-pleaser. Even the pickiest dessert skeptics can’t resist the classic combo of strawberries and cream. And if you want to go the extra mile, this cake pairs beautifully with other fruity recipes like our Creamy Strawberry Shortcake Dip or the refreshing Strawberry Quinoa Salad with Feta.
Ingredients Needed to Make Strawberry Shortcake Layer Cake
For the Strawberry Filling:
- 2 lbs (about 1 kg) of fresh strawberries, hulled and sliced
- ¼ cup granulated sugar
For the Tender Vanilla Cake:
- 2 ½ cups all-purpose flour
- 2 ½ teaspoons baking powder
- 1 teaspoon salt
- ¾ cup unsalted butter, softened
- 1 ½ cups granulated sugar
- 3 large eggs, at room temperature
- 1 tablespoon vanilla extract
- 1 cup buttermilk, at room temperature
For the Stabilized Whipped Cream Frosting:
- 2 cups cold heavy whipping cream
- 1 block (8 oz / 225g) of cream cheese, softened
- 1 cup powdered sugar
- 1 teaspoon vanilla extract
Ingredient Notes
Strawberries: Always go for fresh, ripe strawberries. When they’re in season, their flavor is unbeatable. Macerating them with sugar draws out their juices and turns them into a natural strawberry syrup that keeps the cake moist.
Vanilla Cake: Use room-temperature ingredients. This one tip alone makes a world of difference—it helps the batter emulsify properly for a lighter, fluffier crumb.
Whipped Cream Frosting: Regular whipped cream tends to deflate, but the cream cheese in this recipe adds structure without making it heavy. It pipes beautifully and stays stable even after hours in the fridge.
If you’d like to add a fun twist, try substituting half the strawberries with blueberries or raspberries—it gives your cake a patriotic flair, perfect for holidays like the Fourth of July.
Instructions to Make Strawberry Shortcake Layer Cake – Step by Step
Step 1: Prepare the Strawberry Filling
Start with the strawberries, because they’ll need a little time to get juicy. In a large bowl, combine your sliced strawberries with the ¼ cup of sugar. Stir gently until every slice is coated, then let the mixture rest at room temperature for at least 30 minutes. This maceration process draws out their natural juices, creating that beautiful, syrupy sauce that will soak into the cake layers later. If your strawberries are a little tart, feel free to add an extra tablespoon of sugar.
Step 2: Bake the Cake Layers
Preheat your oven to 350°F (175°C). Grease and flour two 9-inch round cake pans, or line the bottoms with parchment paper for easy removal. In a medium bowl, whisk together the flour, baking powder, and salt—this ensures even distribution of your leavening agents. In a separate large mixing bowl, beat the butter and sugar together with an electric mixer for about 3–4 minutes, until the mixture looks pale and fluffy. This step is where air gets incorporated, so don’t rush it. Beat in the eggs one at a time, followed by the vanilla extract.
Step 3: Combine Wet and Dry Ingredients
With your mixer on low speed, alternate adding the dry flour mixture and the buttermilk to your wet ingredients, starting and ending with the flour. Mix just until everything is combined—overmixing can make your cake dense. The batter should be smooth and slightly thick. Divide it evenly between your prepared cake pans, smoothing the tops with a spatula. Bake for 25–30 minutes, or until a toothpick inserted in the center comes out clean. Let the cakes cool in their pans for 10 minutes before transferring them to a wire rack to cool completely.
Step 4: Make the Stabilized Whipped Cream Frosting
While your cakes cool, let’s talk frosting. In a large bowl, beat the softened cream cheese until smooth. Gradually add the cold heavy cream while continuing to beat on medium-high speed. The mixture will thicken and form soft peaks. Add the powdered sugar and vanilla extract, then keep beating until stiff peaks form. This frosting is smooth, fluffy, and perfectly pipeable—no runny cream here. If you’re curious about similar stabilized whipped toppings, check out the techniques in our Blueberry Cheesecake recipe, which uses a similar base for its rich cream topping.
Step 5: Assemble the First Layer
Place one cake layer on your serving plate or cake stand. To keep things tidy, slip strips of parchment paper under the edges of the cake—this way, any stray frosting won’t mess up your plate. Pipe a “dam” of whipped cream frosting around the outer edge of the cake. This acts like a barrier to keep the strawberries from spilling out. Fill the center with half of your strawberry filling, making sure to spoon some of the juices over the cake to soak in that sweet flavor.
Step 6: Add the Second Layer and Frost the Cake
Gently place the second cake layer on top. Using a spatula, spread a generous layer of whipped cream frosting across the top and sides. The cream cheese in this frosting makes it easy to get those smooth, bakery-style edges. If you’re feeling fancy, you can use a piping bag to create decorative swirls or rosettes. This frosting holds up beautifully, even if you decide to decorate ahead of time.
Step 7: Decorate and Chill
Now comes the fun part—decorating. Top your cake with the remaining strawberry filling, letting a few berries tumble naturally over the edge. For a more elegant look, line the top with halved strawberries in a circular pattern or pile whole ones in the center for a rustic vibe. Once decorated, chill your cake for at least 1–2 hours before serving. This helps the layers set and makes slicing much easier.
Step 8: Slice and Serve
When it’s finally time to slice, use a long serrated knife and wipe it clean between cuts for picture-perfect slices. Each layer should show off the golden cake, juicy strawberries, and creamy frosting—it’s as pretty as it is delicious. Serve it chilled for the best texture. This cake is pure bliss alongside a cup of coffee or even better, a glass of cold milk.
Step 9: Bonus Serving Idea
For a fun twist, serve slices with a drizzle of strawberry syrup or a scoop of vanilla ice cream. Or, for brunch lovers, pair it with a mimosa and pretend you’re at a fancy bakery café.
What to Serve with Strawberry Shortcake Layer Cake
This cake is so versatile it can fit just about any occasion. For spring or summer gatherings, pair it with something light and refreshing like our Apple and Celery Salad or Mediterranean Orzo Salad. If you’re serving it as part of a dessert spread, it pairs perfectly with other fruity sweets like Lemon Blueberry Cupcakes or Mini Strawberry Cheesecakes.
Key Tips for Making Strawberry Shortcake Layer Cake
- Use fresh strawberries. Frozen berries release too much liquid and can make the cake soggy.
- Don’t skip the chilling time. It helps the frosting firm up and the flavors meld together.
- Room temperature ingredients make a big difference for smooth batter and even baking.
- A cake turntable makes frosting easier, but if you don’t have one, a lazy Susan works in a pinch.
- Avoid overbaking. Check your cakes at the 25-minute mark—they should spring back lightly when touched.
Storage and Reheating Tips for Strawberry Shortcake Layer Cake
This cake is best stored in the refrigerator since the frosting contains cream cheese and whipped cream. Cover it with plastic wrap or keep it in a cake carrier. It stays fresh for up to 3 days. If you’d like to make it ahead, bake the cake layers a day in advance and store them tightly wrapped at room temperature. You can make the frosting the day you plan to serve it for the best texture. Avoid freezing once it’s frosted—the whipped cream tends to lose its smoothness after thawing.
FAQs
Can I use frozen strawberries? You can, but the texture won’t be quite the same. Fresh strawberries provide the best flavor and appearance.
Can I make the frosting without cream cheese? You can skip it, but your whipped cream won’t be as stable. If you must, make sure to frost the cake right before serving.
What’s the best way to slice the cake cleanly? Chill it first, then use a sharp serrated knife, wiping it between cuts.
Can I make this gluten-free? Yes, just substitute the flour with a 1:1 gluten-free baking blend.
Can I add other fruits? Definitely! Blueberries, raspberries, or even peaches pair beautifully with the strawberries.
Final Thoughts
Strawberry Shortcake Layer Cake is more than just dessert—it’s a little piece of nostalgia dressed up for the modern table. Every bite delivers that perfect blend of soft vanilla cake, airy whipped cream, and sweet strawberries that taste like summer sunshine. Whether it’s for a birthday, brunch, or just because you feel like treating yourself, this cake is guaranteed to make you smile. For more strawberry inspiration, you might also love our Strawberry Milkshake Pound Cake, which takes similar flavors in a totally different direction. So grab your mixing bowl and a basket of fresh berries—because it’s time to bake something beautiful.
Visit our Pinterest for regular slow cooker recipe updates, or join our Facebook discussions where cooking fans exchange their favorite hearty meal ideas.
Print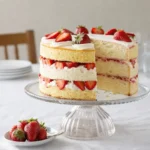
Strawberry Shortcake Layer Cake – Light, Fluffy, and Irresistible
- Prep Time: 30 minutes
- Cook Time: 30 minutes
- Total Time: 1 hour
- Yield: 10–12 servings 1x
- Category: Dessert, Cake
- Method: Baking
- Cuisine: American
- Diet: Vegetarian
Description
This show-stopping Strawberry Shortcake Layer Cake features layers of tender vanilla cake, juicy macerated strawberries, and stabilized whipped cream frosting. A fresh and elegant dessert perfect for spring and summer celebrations.
Ingredients
For the Strawberry Filling:
- 2 lbs (about 1 kg) fresh strawberries, hulled and sliced
- ¼ cup granulated sugar
For the Tender Vanilla Cake:
- 2 ½ cups all-purpose flour
- 2 ½ teaspoons baking powder
- 1 teaspoon salt
- ¾ cup unsalted butter, softened
- 1 ½ cups granulated sugar
- 3 large eggs, at room temperature
- 1 tablespoon vanilla extract
- 1 cup buttermilk, at room temperature
For the Stabilized Whipped Cream Frosting:
- 2 cups cold heavy whipping cream
- 1 block (8 oz / 225g) cream cheese, softened
- 1 cup powdered sugar
- 1 teaspoon vanilla extract
Instructions
1. Prepare the Strawberry Filling. In a large bowl, combine sliced strawberries with ¼ cup sugar. Stir and let sit at room temperature for at least 30 minutes to draw out juices.
2. Preheat oven to 350°F (175°C). Grease and flour two 9-inch round cake pans. In a medium bowl, whisk together flour, baking powder, and salt.
3. In a large bowl, beat butter and sugar until light and fluffy. Add eggs one at a time, then mix in vanilla.
4. Alternate adding flour mixture and buttermilk to the wet ingredients, mixing on low until just combined. Divide batter evenly between pans.
5. Bake for 25–30 minutes, or until a toothpick inserted in the center comes out clean. Let cakes cool completely.
6. Make the Stabilized Whipped Cream Frosting. Beat softened cream cheese until smooth. Slowly add heavy cream and beat until stiff peaks form. Beat in powdered sugar and vanilla until fluffy.
7. Place one cooled cake layer on a serving plate. Pipe a border of whipped cream frosting around the edge and fill the center with half the strawberry filling.
8. Top with the second cake layer. Frost the top and sides with remaining whipped cream frosting.
9. Decorate with remaining strawberry filling or whole strawberries. Chill cake for 1–2 hours before serving.
Notes
Use fresh, ripe strawberries for best flavor and syrupy filling.
Ensure all cake ingredients are at room temperature for a smooth batter.
The cream cheese in the whipped cream stabilizes it, making it perfect for layering and piping.
Store the assembled cake in the refrigerator, loosely covered, for up to 3 days.
Nutrition
- Serving Size: 1 slice
- Calories: 420
- Sugar: 28g
- Sodium: 230mg
- Fat: 24g
- Saturated Fat: 14g
- Unsaturated Fat: 8g
- Trans Fat: 0g
- Carbohydrates: 45g
- Fiber: 1g
- Protein: 6g
- Cholesterol: 105mg