Japanese Strawberry Shortcake — just saying the name feels like a little holiday cheer, doesn’t it? This dreamy dessert is Japan’s most beloved Christmas cake, and once you’ve tasted its cloud-like sponge layers and fresh whipped cream frosting, you’ll understand why it’s such a classic. Imagine biting into something soft, sweet, and delicate, where each layer melts together with juicy strawberries and airy cream.
Yes, it’s that good — and surprisingly, it’s not overly sweet like most Western cakes. In the middle of all your baking adventures this season, this Japanese Strawberry Shortcake will remind you that simple ingredients can create the most extraordinary results. Whether you’re planning a cozy Christmas dinner, a birthday celebration, or just craving something elegant yet light, this cake delivers pure happiness on a plate. And the best part? You don’t need to be a pro baker to make it happen.
Table of Contents
What is Japanese Strawberry Shortcake?
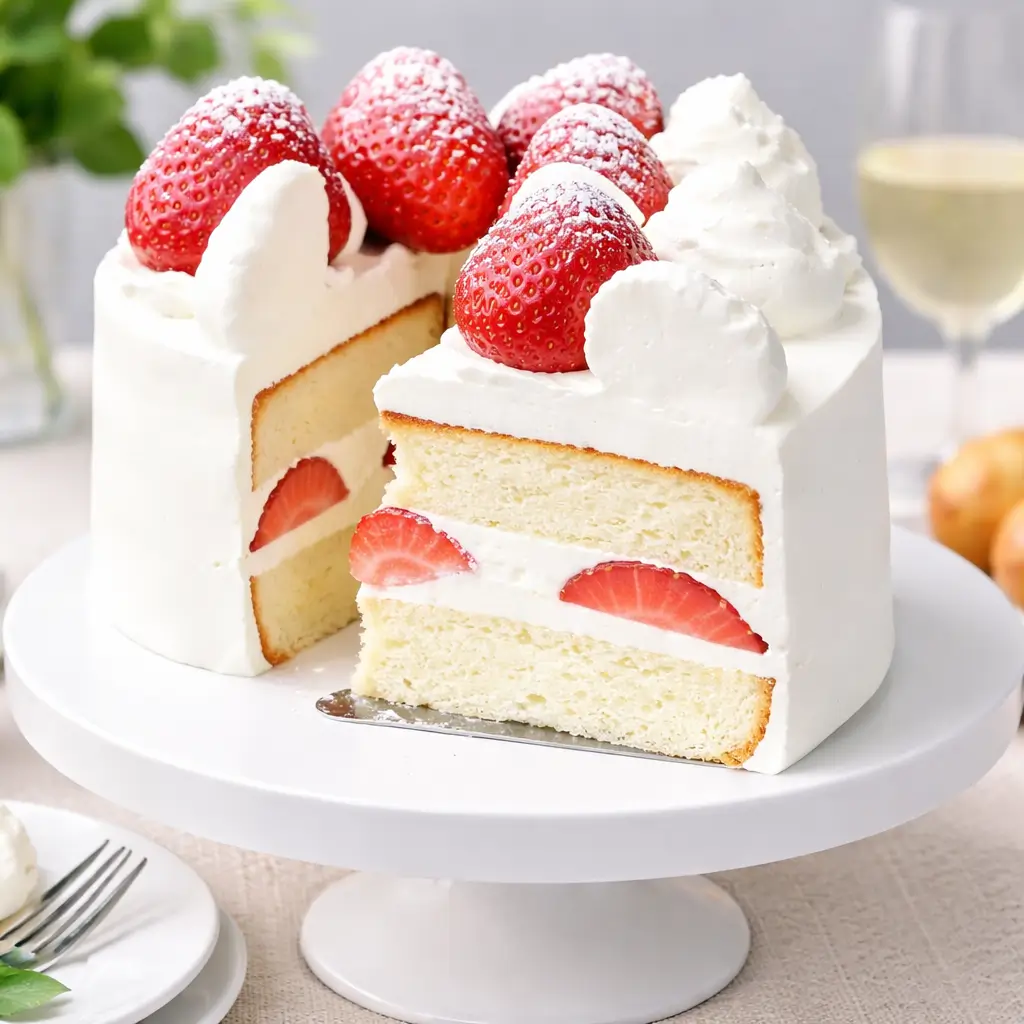
Japanese Strawberry Shortcake, also known as Japanese Christmas Cake, is a light, airy sponge cake layered with fresh strawberries and whipped cream. Unlike the American shortcake version made with biscuit-like layers, this Japanese twist is all about a soft, fluffy sponge that feels like eating a strawberry-flavored cloud. It’s the cake you’ll find in nearly every bakery window in Japan during December, decorated beautifully with whole strawberries and a dusting of powdered sugar that makes it look like it’s been kissed by winter snow.
What sets it apart from traditional Western cakes is its delicacy. The sponge is made with separated egg yolks and whites — a technique that creates a fine, light crumb without using butter. Combined with whipped cream and fresh strawberries, it’s refreshing rather than rich. Think of it as the perfect balance of sweetness, elegance, and celebration.
Reasons to Try Japanese Strawberry Shortcake
If you’ve ever wanted a dessert that looks fancy but feels effortless, this one’s your match. For starters, Japanese Strawberry Shortcake has that “wow” factor — the kind that makes people think you picked it up from a fancy bakery instead of making it at home. The whipped cream frosting gives it a soft, cloud-like appearance, while the strawberries add just the right pop of color and flavor. Another reason to love it? It’s not overly sweet, so even those who “don’t like dessert” can’t resist a slice.
It’s also incredibly versatile — perfect for birthdays, tea parties, or even a romantic Valentine’s dinner. And because it’s made with real ingredients — eggs, flour, cream, and fruit — it feels light and fresh, not heavy or processed. Finally, it’s a fantastic cake to learn if you’re interested in Japanese baking. The method of making a perfect sponge is a skill that will serve you well in all sorts of desserts. Plus, the satisfaction of slicing through those beautiful layers is unbeatable.
Ingredients Needed to Make Japanese Strawberry Shortcake
You won’t need anything fancy for this cake — just quality ingredients and a little patience. Here’s what you’ll need:
Dry Ingredients:
- ½ cup cake flour (65g), sifted
- ¼ cup white sugar (44g) for egg yolks
- 2½ tablespoons white sugar (37g) for egg whites
- ¼ teaspoon baking powder
- ⅛ teaspoon salt
Wet Ingredients:
- 3 large eggs, separated (whites and yolks)
- 2½ tablespoons avocado oil (or neutral vegetable oil)
- 1 tablespoon water
- 1 teaspoon corn syrup (or honey)
- ¼ teaspoon vanilla bean paste or vanilla extract
Whipped Cream Frosting:
- 2 cups cold heavy whipping cream
- 6–8 tablespoons powdered sugar (adjust to taste)
Cake Syrup:
- 3 tablespoons sugar
- ⅓ cup hot water
Fruit:
- 8 ounces of strawberries, washed and dried
That’s it! Simple ingredients that combine into something spectacular. If you want to make the frosting a bit extra-special, you can try my Strawberry Buttercream Frosting recipe for a flavor-packed variation. But the classic whipped cream version keeps it beautifully traditional.
Instructions to Make Japanese Strawberry Shortcake – Step by Step
This is where the magic happens. Follow this step-by-step Japanese Strawberry Shortcake guide carefully — each step builds on the next to give you that perfectly soft and airy texture. Don’t rush the process, and you’ll be rewarded with bakery-worthy results.
Step 1: Prepare the Egg Yolk Mixture
Start by preheating your oven to 350°F. In a medium bowl, combine the egg yolks, ¼ cup of sugar, salt, corn syrup, vanilla, and water. Using a stand or hand mixer, beat the mixture on high speed until it becomes pale and fluffy, and ribbons form when you lift the whisk. This is called the “ribbon stage,” and it’s the foundation of your sponge’s light texture. It might take 4–5 minutes, but don’t skimp here — your patience will pay off with that perfect airy crumb.
Step 2: Whip the Egg Whites into Meringue
In another large bowl, beat your egg whites until foamy. Gradually add the remaining 2½ tablespoons of sugar in three portions, beating each time until the sugar dissolves. Continue mixing until you reach firm peaks — meaning when you lift your whisk, the meringue holds its shape but the tip slightly bends. This meringue will give your cake structure and height. Think of it as the air pocket that makes your cake feel light as a cloud.
Step 3: Combine the Batters
Take half of your meringue and gently fold it into the egg yolk mixture using a spatula. You’re not stirring — you’re folding, which means gently bringing the batter from the bottom over the top to keep it airy. Next, sift your flour and baking powder directly into this mixture in three portions, folding after each addition. You’ll start to see a silky, smooth batter forming. Then, remove about 2 tablespoons of this batter into a small bowl and mix it with the oil until combined. This helps the oil blend evenly when added back into the main batter. Finally, gently fold this back into the main bowl along with the remaining meringue until no streaks remain.
Step 4: Bake the Cake Layers
Line your cake pans with parchment paper (either two 6-inch pans or one 8-inch pan). Pour the batter evenly into the pan(s), then gently tap the pans twice on a flat surface to pop large air bubbles. Bake at 350°F for about 15 minutes (for two 6-inch pans) or 23–25 minutes (for one 8-inch pan). You’ll know it’s done when the top is golden brown and a toothpick inserted in the center comes out clean. The cake should spring back slightly when touched. Once baked, remove it from the oven, let it cool for a few minutes, then carefully remove it from the pan and peel off the parchment paper. Transfer to a wire rack to cool completely.
Step 5: Make the Whipped Cream Frosting
This is where the cake transforms into something heavenly. Using a cold mixing bowl (you can chill it for 10 minutes in the fridge), pour in your heavy cream and powdered sugar. Beat on medium speed until soft peaks form — you want it fluffy but not stiff or grainy. The goal is “medium peaks,” where the cream holds its shape but still looks smooth and silky. Over-beating can turn it grainy or butter-like, so keep an eye on it.
Step 6: Slice and Assemble the Cake
Once your cake is fully cooled, use a serrated knife to slice it evenly into layers. If you have a cake leveler, even better! If not, here’s a trick — mark the cake’s sides with toothpicks to guide your knife. Next, make your sugar syrup by dissolving 3 tablespoons of sugar in ⅓ cup of hot water. Brush the syrup over each cake layer to keep it moist and flavorful. Now, spread a generous layer of whipped cream over the first cake layer, top with sliced strawberries, and then add another layer of cream before placing the next cake layer on top. Repeat until you’ve stacked all your layers.
Step 7: Frost and Decorate
Frost the top and sides of your cake with whipped cream, smoothing it out as evenly as you can with a spatula. Don’t stress if it’s not perfect — that rustic, homemade charm is part of what makes it so appealing. Decorate the top with whole strawberries and a light dusting of powdered sugar for that snowy, festive finish. Chill for 30 minutes before serving — this helps the flavors meld and the cream set beautifully. When you slice into it, those red strawberries peeking through white cream and golden sponge will be absolutely stunning.
For another fruit-forward treat, you might love my Strawberry Cheesecake Dump Cake — it’s another easy, crowd-pleasing dessert that pairs wonderfully with this cake at holiday gatherings.
What to Serve with Japanese Strawberry Shortcake
This cake pairs beautifully with almost anything light and refreshing. A cup of green tea or jasmine tea brings out the delicate sweetness of the strawberries. For a richer option, serve it with a small scoop of vanilla bean ice cream or a drizzle of melted white chocolate. During the holidays, it’s lovely alongside other festive desserts like Lemon Raspberry Bars or even something savory but mild, like Mediterranean Chicken Patties for a full dinner-to-dessert balance. The simplicity of this cake means it complements both hearty and light meals without overwhelming the palate.
Key Tips for Making Japanese Strawberry Shortcake
- Use room temperature eggs. This helps your yolks and whites whip properly for maximum volume.
- Don’t overmix. Folding gently keeps the batter light and airy.
- Use cake flour, not all-purpose. It gives you that delicate, soft crumb that defines this recipe.
- Keep the cream cold. Cold cream whips better and holds its shape longer.
- Decorate right before serving. Fresh strawberries can release moisture over time, so it’s best to add them just before presentation.
If you love light, creamy desserts, check out my Easy Strawberry Crunch Poke Cake — it uses similar techniques with a fun twist!
Storage and Reheating Tips for Japanese Strawberry Shortcake
This cake is best enjoyed fresh, but it can be stored in the fridge for up to 2 days. Keep it covered in an airtight container or wrapped lightly with plastic wrap to prevent the cream from absorbing other fridge odors. Avoid freezing the assembled cake since whipped cream doesn’t thaw well. If you want to make it ahead, you can bake the sponge up to two days before and store it at room temperature (wrapped in plastic). Then, whip your cream and assemble it the day you plan to serve. Reheating isn’t necessary — this cake is meant to be cool and refreshing.
FAQs
Q: Can I make this cake ahead of time?
Yes! You can bake the sponge a day or two ahead, but frost it fresh on the day you’ll serve it for the best texture.
Q: Can I use store-bought whipped cream?
Technically yes, but homemade whipped cream gives a fresher, cleaner flavor and texture that makes all the difference.
Q: What if I don’t have cake flour?
You can make your own by measuring 1 cup of all-purpose flour, removing 2 tablespoons, and replacing them with 2 tablespoons of cornstarch.
Q: Can I use other fruits?
Absolutely. Blueberries, raspberries, or peaches make great substitutes if strawberries aren’t in season.
Q: How do I keep the cake from being too dry?
That’s where the sugar syrup step comes in — don’t skip it! It keeps every bite soft and moist.
Final Thoughts
There’s something special about making a Japanese Strawberry Shortcake from scratch. It’s elegant yet simple, festive yet humble, and above all, it brings people together. It’s not just a cake — it’s a moment of joy, a slice of celebration, and a reminder that sometimes the most beautiful desserts come from the simplest ingredients. Whether you serve it at Christmas, a summer picnic, or just because you deserve something delicious, this recipe will always be a hit. And once you master it, you’ll probably never go back to store-bought cakes again.
If you enjoyed this recipe, check out some of my other crowd-favorite desserts like Strawberry Crumb Bars or Raspberry White Chocolate Cheesecake. They’re all about balance — easy, satisfying, and guaranteed to make your kitchen smell amazing.
Visit our Pinterest for regular slow cooker recipe updates, or join our Facebook discussions where cooking fans exchange their favorite hearty meal ideas.
Print
Japanese Strawberry Shortcake – Soft, Sweet, and Simple Delight
- Prep Time: 35 minutes
- Cook Time: 20 minutes
- Total Time: 55 minutes
- Yield: 6 servings 1x
- Category: Dessert
- Method: Baking
- Cuisine: Asian, Japanese
Description
Japanese strawberry shortcake, aka Japanese Christmas cake, is made of soft layers of sponge cake, fresh strawberries & fresh whipped cream!
Ingredients
- 8 oz strawberries – washed and dried
- Dry Ingredients:
- ½ cup cake flour (65g), sifted
- ¼ cup white sugar (44g) for egg yolks
- 2 ½ Tablespoons white sugar (37g) for egg whites
- ¼ teaspoon baking powder
- ⅛ teaspoon salt (½g)
- Wet Ingredients:
- 3 large eggs – whites and yolks separated
- 2 ½ Tablespoons avocado oil (31g) or neutral vegetable oil
- 1 Tablespoon water (12g)
- 1 teaspoon corn syrup (6g) or honey
- ¼ teaspoon vanilla bean paste or vanilla extract
- Whipped Cream Frosting:
- 2 cups cold heavy whipping cream
- 6 to 8 Tablespoons powdered sugar, to taste
- Cake Syrup:
- 3 Tablespoons sugar
- ⅓ cup hot water
Instructions
1. Preheat oven to 350°F (175°C). In a medium bowl, add egg yolks, ¼ cup sugar, salt, corn syrup, vanilla, and water. Beat on high until pale yellow and fluffy. Set aside.
2. In a large bowl, beat egg whites on high until foamy. Add 2½ tablespoons of sugar in thirds, beating each time. Beat until firm peaks form.
3. Fold half of the meringue into the egg yolk mixture gently. Sift flour and baking powder into the mixture in three parts, folding gently each time.
4. Mix 2 tablespoons of batter with the oil until smooth. Fold this oil mixture back into the batter. Fold in the remaining meringue gently.
5. Pour the batter into a parchment-lined round cake pan (one 8-inch or two 6-inch). Bang pan twice to release air bubbles. Bake for 15 minutes (6-inch) or 23-25 minutes (8-inch) until golden and a toothpick comes out clean.
6. Remove cake from pan and parchment. Cool on a wire rack.
7. Beat cold heavy cream with powdered sugar until medium peaks form. Do not overbeat.
8. Slice cake evenly. Dissolve sugar in hot water to make syrup. Brush syrup onto all cake layers.
9. Slice half the strawberries for the inside, leave half whole for topping.
10. Layer cake with whipped cream and sliced strawberries. Repeat as needed.
11. Frost the cake with remaining whipped cream. Top with whole strawberries and dust with powdered sugar. Serve immediately.
Notes
Use one 8-inch or two 6-inch pans. Avoid nonstick pans as they prevent proper sponge rise.
Whipped cream should be smooth and hold medium peaks. Stop mixing before it becomes grainy or cracks.
For even layers: Use a serrated knife and mark with toothpicks. Avoid wire levelers as sponge cakes are too soft.
For best accuracy, use gram measurements instead of US cups.
Nutrition
- Serving Size: 1 slice
- Calories: 498
- Sugar: 24g
- Sodium: 116mg
- Fat: 38g
- Saturated Fat: 20g
- Unsaturated Fat: 16g
- Trans Fat: 0g
- Carbohydrates: 36g
- Fiber: 1g
- Protein: 6g
- Cholesterol: 202mg