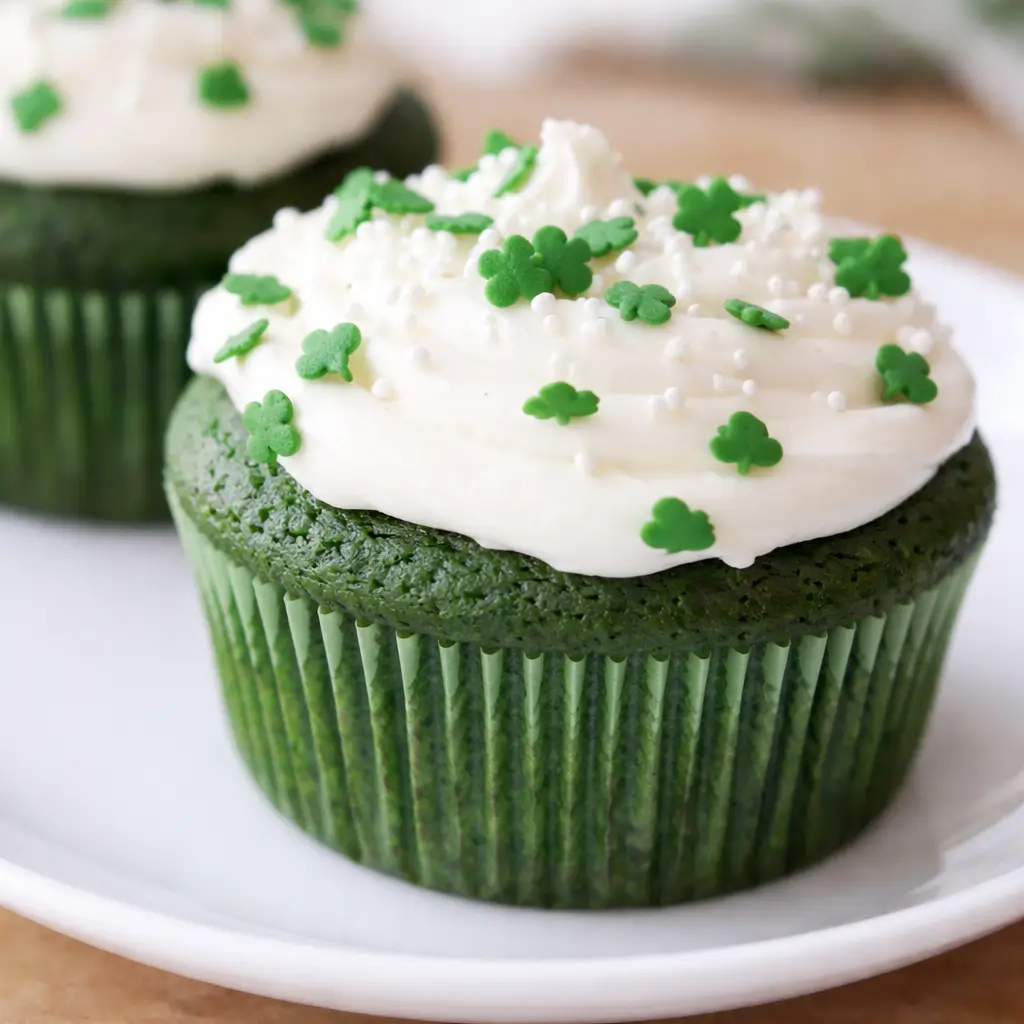
Green Velvet Cake and Cupcakes are where festive fun meets pure Southern comfort. Imagine everything you love about a red velvet cake—moist crumb, velvety texture, tangy cream cheese frosting—but dressed in a gorgeous emerald hue that’s perfect for St. Patrick’s Day, spring celebrations, or when you simply want to switch things up. With the same cocoa-kissed flavor and rich creaminess, this Green Velvet Cake recipe is as delicious as it is eye-catching. Whether you’re baking a full cake or a batch of cupcakes, the result is a showstopper that will have everyone asking for seconds. Plus, you’ll love how easy it is to whip up—no fancy techniques, just pure baking joy.
Table of Contents
What is Green Velvet Cake and Cupcakes?
Green Velvet Cake and Cupcakes are the colorful cousins of the classic red velvet dessert. They share the same soft texture, mild cocoa flavor, and luscious cream cheese frosting but swap the red coloring for green food coloring to create a striking, playful twist. The “velvet” in the name comes from the cake’s smooth, tender crumb—a result of the perfect blend of buttermilk, vinegar, and cocoa. While it might sound fancy, this cake is incredibly simple to make and pairs well with nearly any occasion, from Christmas to spring birthdays. It’s the kind of dessert that makes people smile before they even take a bite.
Reasons to Try Green Velvet Cake and Cupcakes
There are plenty of reasons to give this Green Velvet Cake and Cupcakes recipe a go. First, it’s a conversation starter—few desserts look this stunning on the table! Second, it’s an easy recipe that doesn’t require professional-level baking skills. The ingredients are pantry staples, and the steps are straightforward. Third, the flavor is unbeatable: the balance of cocoa, tangy buttermilk, and silky frosting creates a comforting taste that’s sweet but not overwhelming. Finally, this recipe works beautifully for both a layered cake and cupcakes, making it adaptable to whatever celebration (or craving) you’re planning for. If you loved red velvet, this green version will feel both familiar and delightfully new.
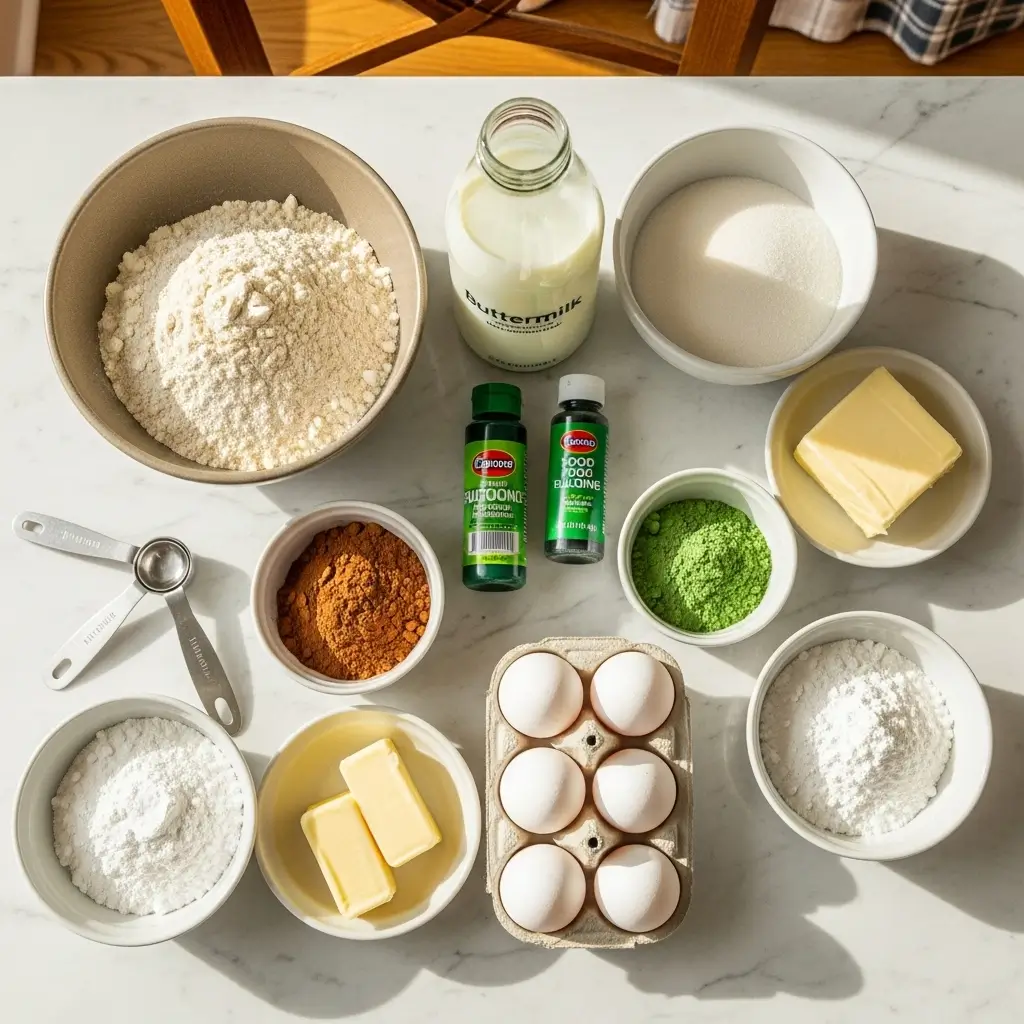
Ingredients Needed to Make Green Velvet Cake and Cupcakes
For the Cake:
- 2 ½ cups all-purpose flour
- 2 cups sugar
- 1 tablespoon cocoa powder
- 1 teaspoon salt
- 1 teaspoon baking soda
- 2 eggs
- 1 cup oil
- 1 cup buttermilk
- 1 tablespoon vinegar
- 1 teaspoon vanilla extract
- 1 ounce green food coloring
For the Cream Cheese Frosting:
- 1 package (8 oz) cream cheese, softened
- ¼ cup butter, softened
- 1 teaspoon vanilla extract
- 1 (2 lb) bag powdered sugar
- Milk as needed for desired consistency
Instructions to Make Green Velvet Cake and Cupcakes
Step 1: Preheat and Prep
Preheat your oven to 350°F. Grease your pans—whether you’re going with a standard 8-inch cake or a muffin tin for cupcakes. A little parchment paper on the bottom never hurts either.
Step 2: Mix the Wet Ingredients
In a medium bowl, lightly whisk the eggs. Add in oil, buttermilk, vinegar, vanilla, and that vibrant green food coloring. Whisk until the color is evenly distributed and the mixture is smooth.
Step 3: Combine the Dry Ingredients
In a large mixing bowl, stir together the flour, sugar, cocoa powder, salt, and baking soda. This ensures everything is evenly blended before the wet ingredients join the party.
Step 4: Blend It All Together
Pour the wet mixture into the dry ingredients and beat on medium-high for about 1–2 minutes, just until the batter looks smooth and glossy. Don’t overmix—this cake should stay tender.
Step 5: Bake to Perfection
Pour the batter evenly into your cake pans or cupcake liners. For an 8-inch cake, bake about 22 minutes; regular cupcakes need around 16 minutes, and mini cupcakes or whoopie pies take closer to 13 minutes. You’ll know they’re done when a toothpick inserted in the center comes out clean.
Step 6: Whip Up the Frosting
In a clean bowl, beat together the cream cheese, butter, and vanilla until creamy. Gradually add powdered sugar, mixing as you go, until the frosting reaches your preferred sweetness and texture. Add a splash of milk if you need to loosen it up.
Step 7: Cool and Frost
Let the cakes or cupcakes cool completely before frosting—patience pays off here! Then generously slather or pipe the cream cheese frosting on top. Store them in the fridge if you’re not serving right away.
For more colorful dessert ideas, check out these Mint Oreo Balls for another sweet, no-fuss treat.
What to Serve with Green Velvet Cake and Cupcakes
This dessert pairs beautifully with just about anything—especially coffee or milk. If you’re serving it at a party, try adding a side of fresh fruit or a scoop of vanilla ice cream for contrast. For a St. Patrick’s Day spread, a platter of Pink Chocolate Covered Strawberries or Valentine Day Sugar Cookie Fudge adds a fun, colorful touch. And for a cozy family dinner, a slice of this cake after something hearty like French Onion Chicken Rice Casserole feels like the perfect finish.
Key Tips for Making Green Velvet Cake and Cupcakes
- Use gel food coloring for a more intense green color without thinning the batter.
- Don’t skip the vinegar—it reacts with the baking soda and buttermilk to create that signature velvet texture.
- Make sure ingredients are at room temperature. It helps the batter mix smoothly and evenly.
- Avoid overbaking. Check cupcakes at 15 minutes and cakes a few minutes before the timer ends.
- Chill your frosting for a few minutes before spreading—it’ll go on smoother and hold its shape better.
Storage and Reheating Tips for Green Velvet Cake and Cupcakes
Store any leftover cake or cupcakes in an airtight container in the refrigerator for up to 5 days. If you want to make them ahead, bake and freeze the unfrosted layers or cupcakes for up to 2 months; thaw completely before frosting. To bring out their best flavor, let refrigerated cake slices sit at room temperature for about 20 minutes before serving. Cream cheese frosting doesn’t love heat, so keep it cool and covered.
FAQs
Can I use natural food coloring? Yes, but natural dyes may create a softer green shade. Spinach or matcha powder can also work for a natural tint.
Can I make this without buttermilk? Absolutely—mix 1 tablespoon of vinegar or lemon juice with 1 cup of milk as a quick substitute.
Can I double the recipe? Definitely! It scales beautifully for layer cakes or party-size batches.
Final Thoughts
Green Velvet Cake and Cupcakes are more than just dessert—they’re a mood. They’re playful, nostalgic, and indulgent all at once. With their velvety texture and tangy frosting, they’re sure to steal the spotlight at any gathering. Whether it’s for St. Patrick’s Day, a spring brunch, or just because you’re craving something fun, this recipe is a winner. Once you’ve tried it, don’t be surprised if it becomes your new go-to velvet cake flavor.
Visit our Pinterest for regular slow cooker recipe updates, or join our Facebook discussions where cooking fans exchange their favorite hearty meal ideas.
Print
Green Velvet Cake and Cupcakes for St. Patrick’s Day Magic
- Prep Time: 15 minutes
- Cook Time: 22 minutes
- Total Time: 37 minutes
- Yield: 1 standard layer cake or 24 cupcakes 1x
- Category: Dessert
- Method: Baking
- Cuisine: American
- Diet: Vegetarian
Description
A moist and vibrant twist on the classic red velvet, this Green Velvet Cake and Cupcakes recipe delivers rich cocoa flavor, tangy buttermilk, and creamy frosting for a stunning dessert perfect for any occasion.
Ingredients
CAKE
- 2 1/2 cups all purpose flour
- 2 cups sugar
- 1 Tablespoon cocoa
- 1 teaspoon salt
- 1 teaspoon baking soda
- 2 eggs
- 1 cup oil
- 1 cup buttermilk
- 1 Tablespoon vinegar
- 1 teaspoon vanilla
- 1 oz green food coloring
CREAM CHEESE FROSTING
- 1 package of softened cream cheese
- 1/4 cup softened butter
- 1 teaspoon vanilla extract
- 1 bag powdered sugar (2 lb bag)
- Milk as needed
Instructions
1. Preheat your oven to 350 degrees.
2. Grease your cake pans, muffin tins, whoopie pie pans, whatever method you decide to go with.
3. Lightly stir eggs in a medium bowl with whisk. Add in remaining liquid ingredients. Whisk until blended, then stir in food coloring and set aside.
4. Place all dry ingredients in your mixing bowl and stir together well.
5. Pour your wet ingredients into your dry ingredients and mix on medium-high for about a minute or two until well combined.
6. Pour the batter into cake pans or cupcake pans.
7. Baking times will vary based on what you are using. For one 8″ cake pan, it was about 22 minutes. Regular size cupcakes were around 16 minutes. Mini cupcakes and whoopie pie pans were both about 13 minutes.
8. Cream together cream cheese, butter and vanilla in a bowl until smooth.
9. Gradually add in powdered sugar and continue mixing.
10. Add in milk as needed to reach the desired consistency.
11. Store frosting and frosted cupcakes in refrigerator.
Notes
Adapted from Bakerella. You can easily divide the batter between two 8-inch cake pans or make about 24 standard cupcakes. Store any leftovers in the refrigerator due to the cream cheese frosting.
Nutrition
- Serving Size: 1 cupcake or 1 slice of cake
- Calories: 340
- Sugar: 28g
- Sodium: 210mg
- Fat: 16g
- Saturated Fat: 7g
- Unsaturated Fat: 8g
- Trans Fat: 0g
- Carbohydrates: 44g
- Fiber: 1g
- Protein: 4g
- Cholesterol: 45mg