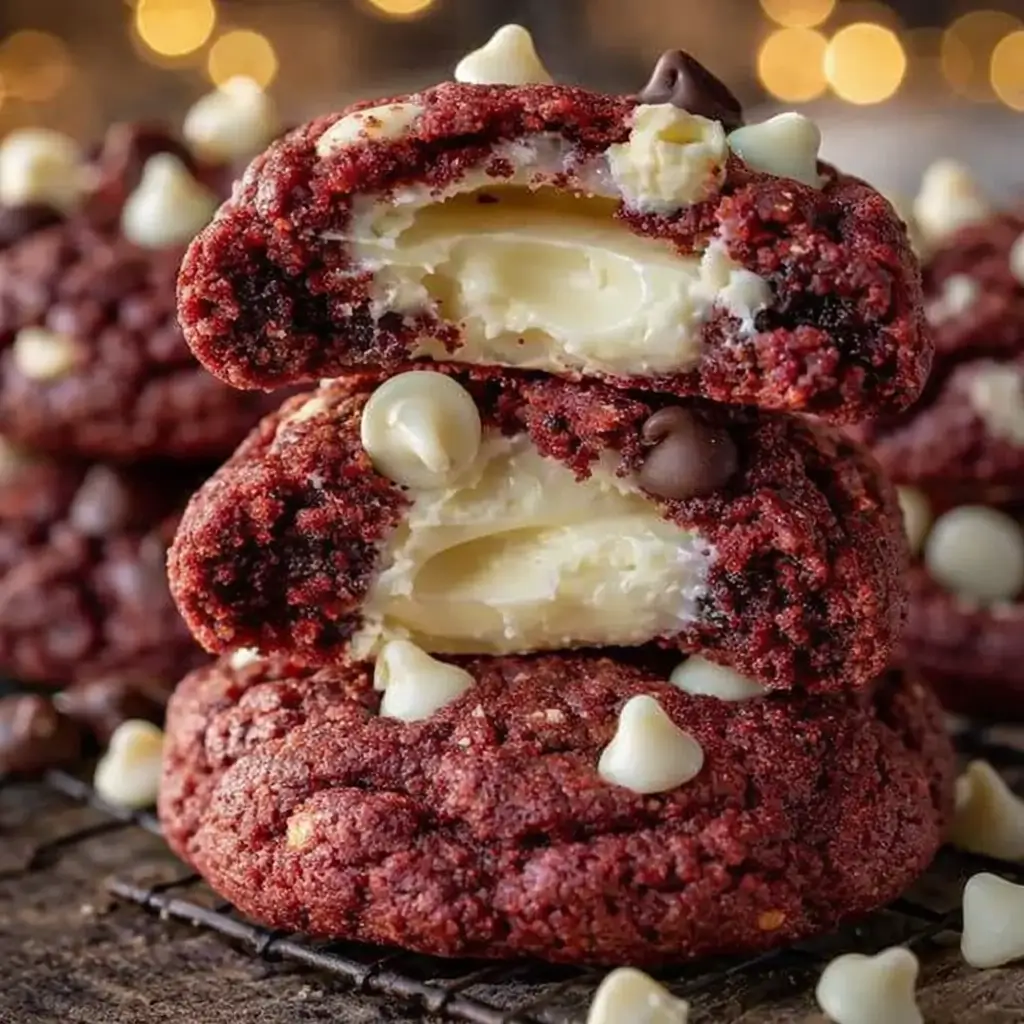
Cheesecake Stuffed Red Velvet Cookies are where dessert dreams and late-night cravings finally shake hands. Imagine the soft, cocoa-rich bite of a red velvet cookie giving way to a surprise—an oozy, creamy cheesecake center that practically melts in your mouth. This mash-up dessert is perfect for birthdays, Valentine’s Day, or any random Tuesday that just needs a little extra joy.
Whether you’re baking for your besties, your kids, or just yourself (no judgment here), these cookies promise drama—in the best possible way. If you’ve ever wanted to make something that looks straight out of a bakery window without a pastry degree, this recipe’s for you. Let’s roll up those sleeves and get that mixer humming because Cheesecake Stuffed Red Velvet Cookies are about to become your new signature treat.
Table of Contents
What is Cheesecake Stuffed Red Velvet Cookies?
Picture this: classic red velvet flavor—soft, velvety, and slightly tangy—wrapped around a luscious cream cheese center. It’s like your favorite slice of red velvet cake and a cheesecake decided to go steady and had cookie babies. Each bite gives you that perfect balance of cocoa and vanilla with a creamy surprise that hits just right. These cookies are soft in the center, chewy on the edges, and have that rich red hue that screams “festive.”
Whether you add white chocolate chips for sweetness or sprinkles for fun, this dessert feels special without being fussy. You can whip them up for parties, gift boxes, or just to treat yourself after a long week because honestly, who needs an excuse for cookies stuffed with cheesecake?
Reasons to Try Cheesecake Stuffed Red Velvet Cookies
Let’s be real—life’s too short for boring cookies. These Cheesecake Stuffed Red Velvet Cookies bring that “wow” factor with every bite. First, they’re total showstoppers on any dessert table—people will assume you spent hours making them. Second, they combine two desserts in one (cookie + cheesecake = genius).
Third, they freeze beautifully, which means you can stash some away for future sweet emergencies. If you love red velvet cake but don’t feel like breaking out cake pans, this is the lazy baker’s dream. And if you’re chasing that Pinterest-worthy aesthetic without the stress, these beauties deliver. For an even more decadent twist, try pairing them with a warm mug of hot cocoa or alongside a scoop of vanilla ice cream for pure indulgence.
Ingredients Needed to Make Cheesecake Stuffed Red Velvet Cookies
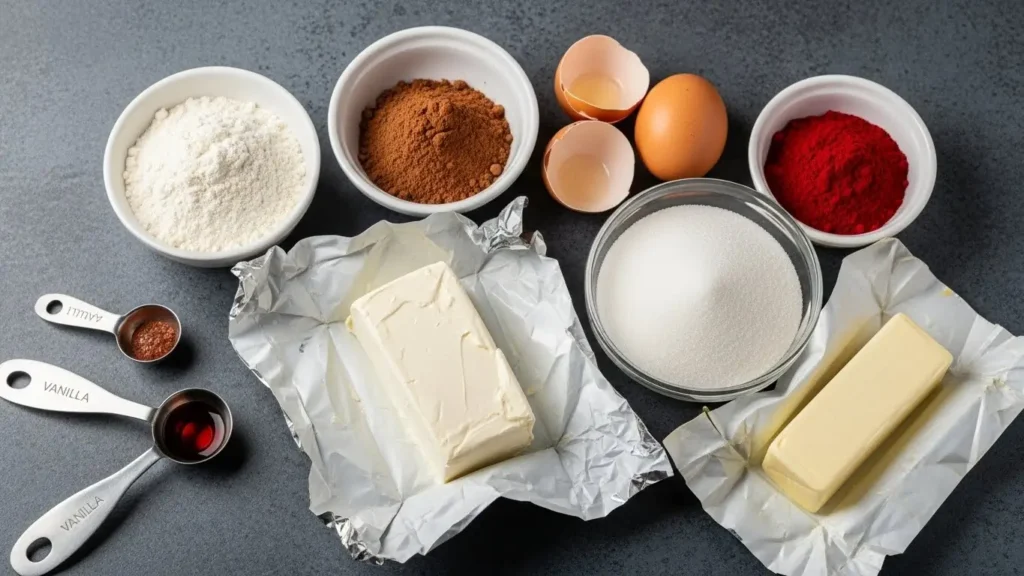
- 2 ½ cups all-purpose flour
- 2 tablespoons cocoa powder
- 1 teaspoon baking soda
- ½ teaspoon salt
- ½ cup unsalted butter, softened
- 1 cup granulated sugar
- ½ cup packed brown sugar
- 2 large eggs, room temperature
- 2 teaspoons vanilla extract
- 2 tablespoons liquid red food coloring (or 1 teaspoon gel)
- 1 teaspoon white vinegar
- Filling: 8 oz cream cheese, softened + ⅓ cup powdered sugar + ½ teaspoon vanilla extract
- Optional: ½ cup white chocolate chips, sprinkles
Instructions to Make Cheesecake Stuffed Red Velvet Cookies (Step by Step)
If you’ve ever wondered how those gorgeous, bakery-style Cheesecake Stuffed Red Velvet Cookies come together, this step-by-step guide will walk you through every detail—from mixing the dough to that final, glorious bite. Follow along carefully, and you’ll master this recipe on your first try. You’ll also find helpful tips sprinkled throughout, plus a few related recipes to explore if you’re craving more creamy, cheesecake-inspired desserts later.
Step 1: Prepare the Cheesecake Filling
Let’s start with the heart of the recipe—the creamy cheesecake center. In a medium bowl, combine softened cream cheese, powdered sugar, and vanilla extract. Use a hand or stand mixer to beat the mixture until it’s completely smooth and fluffy. You’re looking for a texture similar to frosting—no lumps allowed!
Once it’s velvety smooth, scoop out heaping teaspoons of filling onto a parchment-lined baking sheet. You’ll want about 16 dollops—one for each cookie. Place the tray in the freezer for at least 30 minutes. This step ensures that the cheesecake centers firm up, making them easier to stuff later. (Freezing prevents the filling from leaking out during baking—one of the best step by step tips for perfect results.)
Pro tip: If you love this creamy element, check out our Strawberry Cheesecake Truffle Balls for another sweet way to use a similar filling.
Step 2: Mix the Dry Ingredients
In a large mixing bowl, whisk together all-purpose flour, cocoa powder, baking soda, and salt. This ensures that everything is evenly distributed and helps the cookies rise properly. Don’t skip this step by step blending—it’s what gives your cookies that chewy, bakery texture.
If you’re making gluten-free cookies, this is also the perfect time to use a 1:1 gluten-free baking flour substitute (you can read about ingredient swaps and substitutions in our related baking guides).
Step 3: Cream the Butter and Sugars
In a separate large bowl, add softened butter, granulated sugar, and packed brown sugar. Beat with an electric mixer for about 2–3 minutes, until the mixture turns pale and fluffy. This process incorporates air into the dough, giving your cookies that light yet chewy texture.
When done right, this mixture will resemble whipped frosting—smooth and fluffy. Don’t rush this step by step creaming—it’s what separates homemade cookies from store-bought ones.
Step 4: Add the Wet Ingredients
Next, beat in the eggs one at a time. Then, add vanilla extract, red food coloring, and white vinegar. The vinegar might sound odd, but it’s what gives red velvet its signature tang and vibrant color. If you’re using gel food coloring, you’ll need less than liquid—just a teaspoon usually does the trick.
Once mixed, your dough should be a deep, luxurious red. If it’s too thick, add a splash of milk. This step by step mixing helps create that classic red velvet flavor balance—sweet, tangy, and slightly cocoa-rich.
Baking Bonus: For another fun twist on red velvet desserts, check out our Red Velvet Cinnamon Roll recipe—perfect for breakfast or brunch.
Step 5: Combine Wet and Dry Ingredients
Now, slowly add the dry mixture to your wet mixture in two batches. Mix on low speed until the dough just comes together. Avoid overmixing—this can make your cookies dense instead of soft.
The finished dough should be thick, soft, and slightly sticky. If it feels too sticky to handle, that’s totally normal—it’ll firm up once chilled in the next step by step process.
Step 6: Chill the Dough
Cover the bowl with plastic wrap and refrigerate it for at least 30 minutes. This is an essential step by step process to prevent your cookies from spreading too much while baking. Chilling also helps the flavors deepen, giving you richer, more complex cookies.
If you’re planning ahead, you can chill the dough overnight—it’ll bake up beautifully the next day.
Related Tip: If you love make-ahead recipes, you’ll also enjoy our One-Pot Creamy Beef and Shells—a savory dinner you can prep ahead just like these cookies.
Step 7: Assemble the Cookies
Preheat your oven to 350°F (175°C) and line two baking sheets with parchment paper. Now comes the fun part—stuffing! Scoop about 2 tablespoons of chilled dough and flatten it into a small disk with your hands.
Take one frozen cheesecake filling from the freezer and place it in the center of the disk. Gently wrap the dough around it, making sure the filling is fully enclosed. Roll it into a ball, sealing the edges well to prevent any leaks while baking.
Place each cookie ball 2 inches apart on your baking sheet. This step by step technique is what gives you those perfect, thick, bakery-style cookies with hidden creamy centers.
Optional: Roll the dough balls in sprinkles or fold in a few white chocolate chips before baking for a fun, colorful finish.
Step 8: Bake the Cookies
Bake in the preheated oven for 12–14 minutes, just until the edges are set and the tops start to crack slightly. Don’t overbake—remember, cookies continue cooking on the tray after being removed from the oven.
Allow the cookies to cool on the pan for 5 minutes, then transfer them to a wire rack to cool completely. When you break one open, you’ll reveal that irresistible creamy cheesecake core.
Step 9: Cool, Serve, and Enjoy
Once your Cheesecake Stuffed Red Velvet Cookies have cooled, it’s time to serve! These are amazing warm (the filling gets all gooey) or chilled from the fridge (the cheesecake becomes dense and fudgy).
Pair them with a cold glass of milk, coffee, or even a mug of Spicy Cajun Potato Soup for a cozy comfort meal that balances savory and sweet.
What to Serve with Cheesecake Stuffed Red Velvet Cookies
These cookies are a dessert all on their own, but pairing them makes them even better. Try serving them with coffee or a glass of cold milk for that nostalgic comfort. If you’re hosting, plate them next to chocolate-dipped strawberries or a scoop of vanilla ice cream to balance the richness. For holiday spreads, they pair beautifully with Broccoli and Cheese Cracker Casserole for a sweet finish after a savory dish. You could also crumble one over ice cream sundaes or milkshakes for an over-the-top treat that’ll make everyone at the table swoon.
Key Tips for Making Cheesecake Stuffed Red Velvet Cookies
- Freeze the filling: It’s the secret to getting that perfect stuffed center without leaks.
- Chill the dough: A must for thick, chewy cookies that don’t spread.
- Seal the edges: You don’t want cheesecake lava escaping mid-bake.
- Use gel food coloring: It gives that deep, bakery-red hue.
- Test one cookie first: Always a good move to see how your dough behaves before baking the full batch.
- Optional upgrade: Add white chocolate chips or sprinkles for flair.
Storage and Reheating Tips for Cheesecake Stuffed Red Velvet Cookies
Store at room temp for up to 3 days in an airtight container, or refrigerate for up to a week. They taste just as good cold, especially if you like your cheesecake extra firm. For longer storage, freeze baked cookies for up to 3 months. To reheat, pop one in the microwave for 10–15 seconds—it’ll taste freshly baked again. If you froze the dough instead, let it sit at room temperature for about 20 minutes before baking.
FAQs
Can I make these gluten-free? Yes, swap the flour for a 1:1 gluten-free baking blend.
Can I use natural food coloring? Sure, but the red might be less vibrant.
Do they need to be refrigerated? Only if you want to keep them longer than a few days.
Can I make mini versions? Absolutely—just reduce baking time to 8–10 minutes.
Final Thoughts
Cheesecake Stuffed Red Velvet Cookies are the dessert you never knew you needed but now can’t stop thinking about. They’re soft, indulgent, and just fancy enough to impress without being fussy. Whether you’re baking for the holidays, a girls’ night, or simply to treat yourself, these cookies deliver that bakery-level satisfaction right from your home kitchen. Go ahead—grab your mixer and make magic happen today!
Visit our Pinterest for regular slow cooker recipe updates, or join our Facebook discussions where cooking fans exchange their favorite hearty meal ideas.
Print
Cheesecake Stuffed Red Velvet Cookies
- Prep Time: 25 minutes
- Cook Time: 14 minutes
- Total Time: 1 hour
- Yield: 16 cookies 1x
- Category: Dessert
- Method: Baking
- Cuisine: American
- Diet: Vegetarian
Description
These soft, chewy red velvet cookies are stuffed with a creamy cheesecake center for a show-stopping dessert mash-up. Perfect for parties, birthdays, or whenever you want to wow your friends with a Pinterest-worthy treat.
Ingredients
- 2 1/2 cups all-purpose flour
- 2 tablespoons cocoa powder
- 1 teaspoon baking soda
- 1/2 teaspoon salt
- 1/2 cup unsalted butter, softened
- 1 cup granulated sugar
- 1/2 cup brown sugar, packed
- 2 large eggs, room temperature
- 2 teaspoons vanilla extract
- 2 tablespoons liquid red food coloring or 1 teaspoon gel food coloring
- 1 teaspoon white vinegar
- 8 ounces cream cheese, softened
- 1/3 cup powdered sugar
- 1/2 teaspoon vanilla extract (for filling)
- Optional: 1/2 cup white chocolate chips
- Optional: Sprinkles
Instructions
1. In a medium bowl, beat together cream cheese, powdered sugar, and vanilla extract until smooth and creamy. Scoop heaping teaspoons onto a parchment-lined plate (about 16 dollops) and freeze for at least 30 minutes.
2. In a large bowl, whisk together flour, cocoa powder, baking soda, and salt.
3. In another bowl, beat softened butter, granulated sugar, and brown sugar until light and fluffy (about 2 minutes).
4. Beat in eggs one at a time, then add vanilla extract, food coloring, and vinegar. Mix until fully combined.
5. Add dry ingredients to wet mixture in two batches, mixing on low until just combined. Do not overmix.
6. Cover the bowl with plastic wrap and chill for at least 30 minutes.
7. Preheat oven to 350°F (175°C). Line baking sheets with parchment paper.
8. Scoop out 2 tablespoons of dough and flatten into a disk. Place a frozen cheesecake dollop in the center, wrap dough around it, and seal completely. Roll gently to form a ball and place on baking sheet, spaced 2 inches apart.
9. Bake for 12-14 minutes, until edges are set and tops are just starting to crack. Do not overbake.
10. Cool cookies on the pan for 5 minutes, then transfer to a wire rack. Let cool before serving.
Notes
Freeze the cheesecake filling before stuffing to prevent leaks.
Chill the dough for thick, chewy cookies.
Seal the edges well around the filling.
Use gel food coloring for vibrant red cookies.
Test bake one cookie first to check for leaks or spreading.
Cookies can be made gluten-free or vegan with substitutions.
Store at room temperature for 3 days, refrigerate for up to a week, or freeze for 2-3 months.
Nutrition
- Serving Size: 1 cookie
- Calories: 210
- Sugar: 16
- Sodium: 120
- Fat: 10
- Saturated Fat: 6
- Unsaturated Fat: 3
- Trans Fat: 0g
- Carbohydrates: 28
- Fiber: 1
- Protein: 3
- Cholesterol: 35mg